
I have mentioned that I will start to get outside work done to help me finish the boat. The people I have approached are people I saw work on Dennis’s Nine Lives and was impressed by the quality of their work. One guy (Fergo) has worked on the Ellen Macarthur world record setting trimaran as well as other high profile work. He is going to help me fit my wrap around windows. He wants to fit the windows and have the boat faired to his work rather than fit his windows to the way the boat is faired, he believes this will result in a much better finish and fit (seal) to the windows especially given they are so big and such a large potential for leaking if not done properly, so I am going with his advise. Then after the windows are fitted (and removed again) the roof and deck will be faired to the window frames. And the other guy is the person who finally faired (Dennis had 3 different teams work on it) and then painted Nine Lives. He has worked with Fergo and agrees with him so he will come in (with others under him at times) and fair the boat ready for painting and will now doubt paint it as well. Then another of Fergo’s specialties is making and fitting internal linings, and we will make them to finish the inside. The combination of these 2 will result, I am very confident, of the boat being finished to a high standard externally and internally and have it on the water before the end of next year.
So in preparation for Fergo starting on the windows soon, I have to have the side decks glued and glassed on. He could work without them being fitted but having to work on just a 300mm side deck is difficult and probably dangerous. So I have started on getting them on, starting with the Port side deck. I had started fairing the inside of the area above the bathroom in case it is too difficult to line the inside of the shower (or just easier to fair and paint), and one thing I do know is that it is much easier fairing the inside section upside down on the ground so working at table height rather than doing it upside down on the boat once the deck goes on. I applied the first layer of bog by towelling it on, but having sanded it I realised that it was particularly low at the bottom but ok at the sides and that the best way to get it fair would be to use a batten as a screed in exactly the same way I did the forebeam except pushing it instead of pulling it because the curve is concave instead of convex. It worked.


Once the new bog layer had set (overnight) I was surprised as how little sanding it needed to get it fair. Dean, who I will hire to fair my boat told me that the key to getting any fairing done well and fast (and with minimum hard work) was to get the bog on fair to start with, and having an almost fair surface to start with was half the job done which is one of the features of a flat panel design. But his advise proved correct because having used the batten to screed, the bog layer was almost already fair. The bulk of the sanding was to smooth out the rough top layer of bog caused by the screed itself. While my shoulders were sore at the end, I had it fair in less than half an hour. I used the pool noodle as the torture board, criss cross sanding.


With the bathroom section faired I got some help and lifted the port side deck back onto the boat. It had already been fitted, and the dagger case cut out so it was easy to fit it back on (the starboard side has not been refitted since cutting the dagger case out so I dont know for sure yet it fits). The entire look of the boat changes once the side decks go on. It is a very satisfying moment. After a few minutes admiring it I pulled it away from the boat again and placed a block under it to hold it away from the bulkheads so that I could reach the forward ones to get glue onto them. The ones aft of bulkhead 2 are accessible from inside the boat and I can push the deck panel away from the bulkheads to get glue onto them, including the bulkhead 3 which is exposed by cutting the door out to reveal the storage area in front of the wardrobe.


After spreading glue onto each bulkhead I pulled the deck down onto the boat using rachet straps in 4 places along the hull. Once each bulkhead was glued to the deck panel I coved each one in preparation for glassing using the excess that squeezed out and adding more compound where needed. I usually prefer to glass onto wet coving to save the extra layer of work involved in sanding dry coves to accept the glass. But because of time constraints I was only able to get a few of the tapes onto wet coving. I am not concerned as many of the hull coves were glasses dry and I actually got a much more attractive finish. The strength is no less either way as the cove itself is a secondary bond as is the tape to the bulkhead and deck panel, the only chemical bond in a wet on wet is of the tape to the cove compound which has a secondary bond anyway.
With the side deck taped on I moved away from it for a while and helped Jake with his dingy and got back to the bridgedeck furniture. But with the port side deck on the amount of light in the boat was greatly diminished, so I remedied this by removing the port side rear window, finally. It has sat in place on its 4 tabs for the entire build, waiting to be released. It took less than a minute to run the jigsaw over it to remove it so the work was highly symbolic, but another small job ticked off. Let there be light!


The bridgedeck furniture is progressing slowly not least because of the side deck work so boat work is progressing. I have glassed a panel into the bridgedeck that forms the end of the lounge on the starboard side and the other side of this panel is to be fitted with insulation panels for an inbuilt fridge. The return section of the lounge past the fridge end panel is to be a chaise, that is it will not have a back just the seat cushion. The reason for this is that it gives the area a more open feel which contributes to the feeling of space and size. Anyone sitting there would most likely only ever sit there to eat at the table among company so the seat back wont be missed much. Like everything else, it is a compromise.


The curved kickboard finally gives the shape and proportion to the lounge. In the end creating the curves of the kickboard and front panel on the inside section of the lounge were easy to create with kerfing. Usually kerfing results in a series of short flats creating a curve which then need to be faired out. I have been looking at ways to glass a panel to avoid the fairing but in the case of these first 2 curves, the kerfs are on the outside of the curve on the inside of the storage space so not as visible. With the kerfs on the outside of a bend you pull the cuts apart in the curve not push them together and then fill the larger gaps with coving compound and glassing it. This results in a more fluid circle and not have the flat sections as it is only the front glass curving to the shape required.

The kickboard is anchored to the bridgedeck by the fact it is glassed to it so it is much easier to build the shape as I go because getting it cajoled into shape is possible and holding it there whilst the glassing sets. But the facia front panel above it is not so easy to hold in place as it only gets glassed to furniture framing and braces I glue and glass in, so I have decided it will be easier to build off the boat into one large piece then glass it into the boat as a completed shape rather than shaping it as I go. I have screwed the front panel section along the long part of the lounge to the frames in order to use the kickboard to guide the shaping of the facia curves. I will then take it back off the boat to finish its shape at least up to the starboard stair well before glassing it into the boat. Note also that there is a gap between the kickboard and the facia, this gap is deliberate and wont be filled in with a horizontal joining piece because I am using this gap as a method of venting for the under seat cupboards, so that things cannot get mouldy in there and also if I store things like batteries they can vent and have any outgases carried away or dispersed by the venting. The vent is invisible so it works out well.
Back on the side deck and I sanded the coves I did not glass and glassed them. A tip on glassing a curve upside down. Always concentrate on the outside of the curve first. It is longer. If you do not you will find it wants to lift off because it is stretched compared to the inside of the curve. You will get bunching or overlap on the inside more so the tighter the curve but double bias is extremely forgiving, it allows you to spread the overlaps out so that eventually it all seats well, but no matter what you try, if the outside is stretched too tightly it will lift off somewhere, and if gravity is aiding it, such as upside down in a side deck to bulkhead situation, all the more so. Take my word for it, the job will progress much easier if you get the long part of the curve bedded to the substrate first then worry about the overlap on the shorter inside. I have been peelply covering all of my taping but did not bother with these upside down curved tapes. Peelply is near impossible to deal with in curves so I didn’t bother. All of my taping will be under linings anyway but I will just hit them with a sander to finish them anyway, before giving the under lining areas a coat of white epoxy to finish/seal.


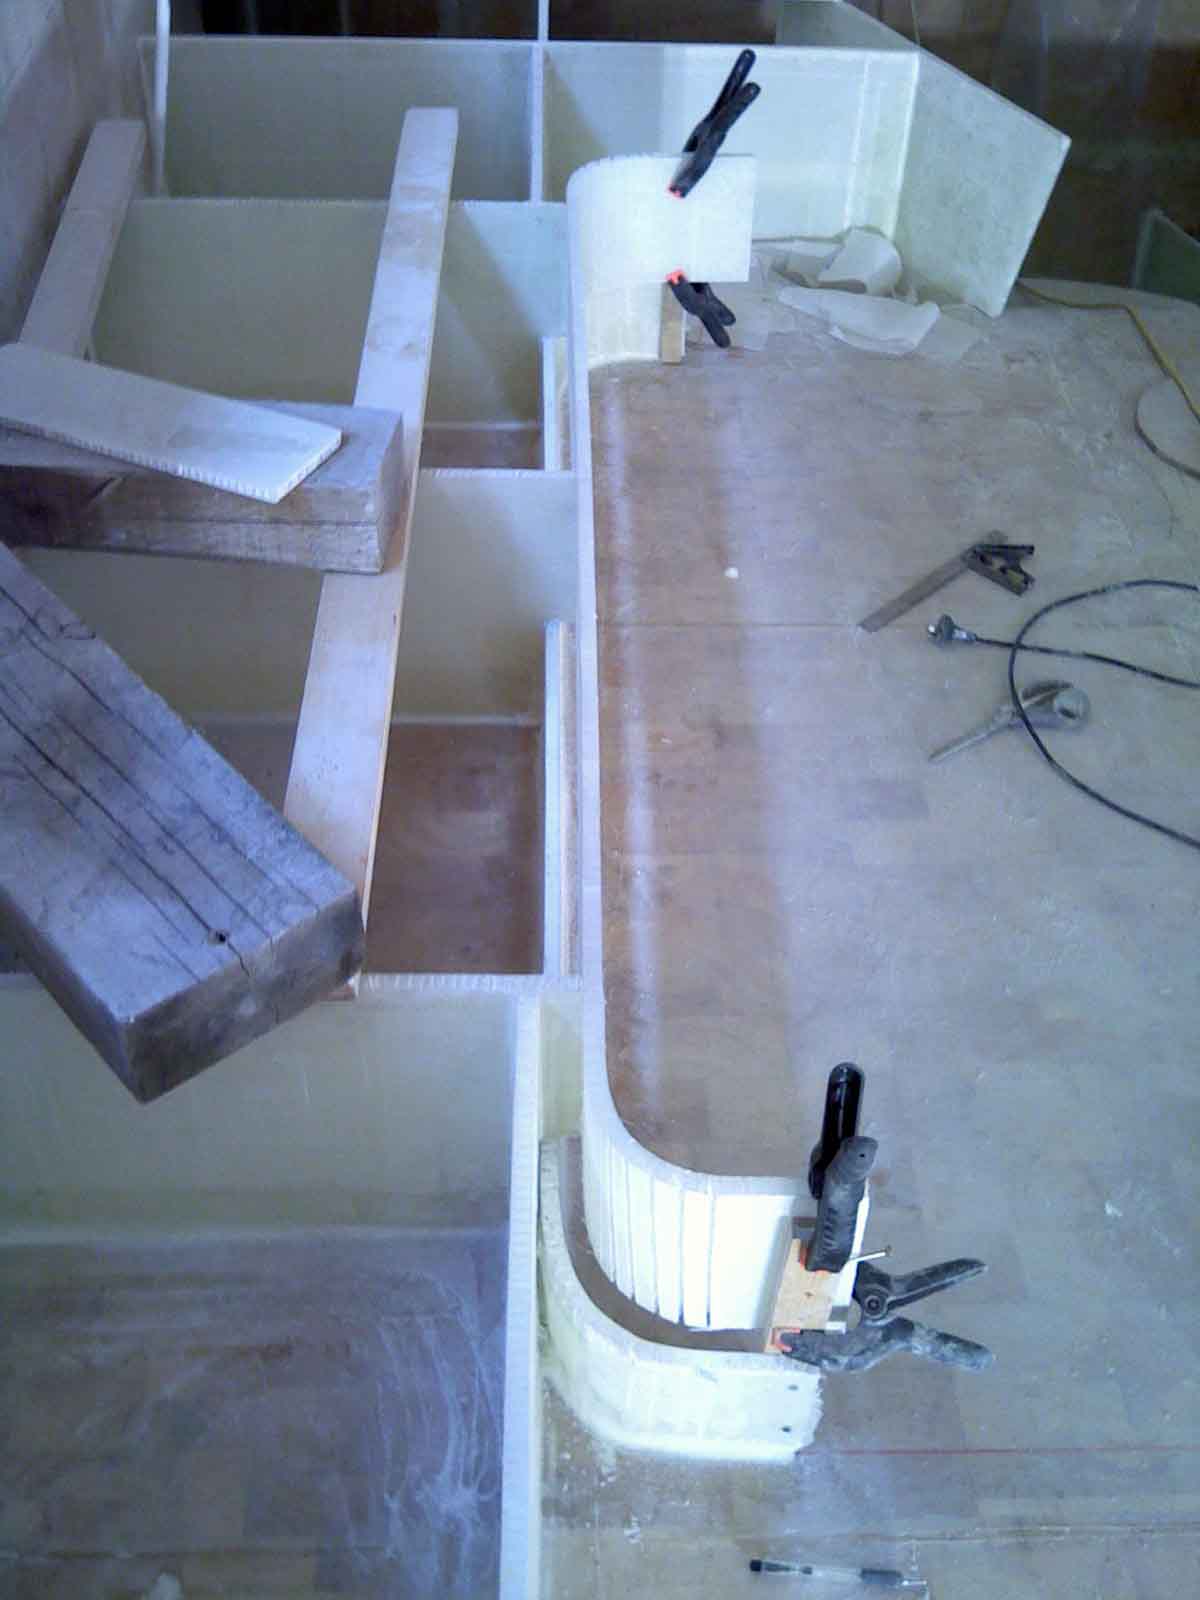
The taping of structural joins anywhere on the boat is always 2 layers of tape, 150mm then 100mm and I did these joins the same way. Before coving these joins I had pulled this curved panel down tightly against the bulkheads by using ratchet straps slung over the hull then attached with a clamp to some strong point on the boat and tied off to the strongback which is still under the boat. At the bows I was able to attach the ratchet straps to themselves by encircling the hull. Once the panel was pulled in tightly, I used cello tape coated (same ones I used when making the hulls all those years ago!) with the screw through the gap between the panels, in some places barely 1mm in others 3 or 4mm) to pull the hull side out or push it in to meet the side deck panel. I then pushed glue into the joins. I had Jake on the inside cleaning up the pushed through glue and pushing glue into sections I did not fill from the outside so that both sides got a smooth and full join of glue. The only sections not getting glue were behind the blocks and of course the forward 2 sections that I cannot access until I have cut through the (faired) deck for the forward sail locker, and through a temporary access hole I will have to cut into bulkhead 0. This must be done so the rest of the joins can be filled, coved and taped.


The top deck join was a little more difficult for 2 reasons. Firstly we had gravity working directly against us, the glue had to be thick enough to resist falling/dripping through the gap to the sole below. But also because when the strip planking was done, the hull side panel was there to strip plank against, but the deck panel was not. I striped to a centreline mark and stringline. Than at some later point when the side deck was off the boat again I glued and glassed the side decks on, again to that centre line. Somehow I managed to get a 10mm gap in places. This size gap is too large to fill with glue, it just wont hold before falling through the gap. One solution is to tape the underside of the join to catch and hold the glue. It worked for me on the hulls, but another which I also employed an even bigger gaps on the keel panels was to cut strips of duflex off to fit into the gaps. This is what I did, it took about an extra half an hour to shape them to exactly fit the gaps and with Jake below in the boat, I applied glue to the strips and wedged them in, then pushed glue in from above and Jake pushed glue in from underneath and screwed blocks in as we went pulling it all flush to each other.
Now that the bulkheads are all taped (well the ones I can get to for now) and the joins glued, the next step is to sand the joins smooth and tape the joins both sides, a series of 2 meter or so tapes inside and 12meter long tapes outside. I will use the wombat for the long tapes, which I hope to do next weekend. This work, is obviously high visual impact, and a serious milestone in any Schionning cat build, but also very very satisfying to look at. I have missed not seeing the full beautiful Schionning shape by having the side decks off the boat. Hopefully with 3 more weekends left this month, I will have the starboard side deck on this month also.
Jake and Jo have been down from Queensland for the Easter school holidays and it has been fun having Jake help me on the building. I have not counted his hours as we have spent about half the time we have been at the shed working on his dingy, so it evened out. But this has been a very productive 4 days and lots of fun. And of course I get to see my wonderful wife again. 1 month of this years separation due to Jakes last school year is already down, only 7 or 8 to go. With cooler weather finally upon us (surely that’s got to be it for high 20’s or 30’s temps until next summer?) I hope to continue in this fashion and really get some work done. The sooner I do, the sooner Jo and I can spend all of our time together on the boat.


