
Yuge post. Its beautiful. Trust me, I have the best posts. But this is the yugest of posts.
Joking aside, this is probably the second most important milestone with only launch day more exciting.
And just like launch day, if you set a date to paint then there is a looming deadline for weeks and more work to do than time left to do it in.
My brother drove up from interstate to paint it for me although I did do a little of the painting and I completely sprayed the highbuild final coat. So you could say I painted the boat and not be totally fibbing. In the end, as has been the case for the last year or 2, I have run out of time and not got as much of the finer finishing work done and the moment the gloss hit those spots they shone like neons. Never mind. You wont see them from the pictures and for the most part the boat looks fantastic.
But first things first. I left off having cut the stanchions to size, rounding the ends and giving them a light fairing before hand painting in black gloss 2 pack.
I have since glued and glassed them into the boat and did the same for the bow seats. I came up with what I now describe as a good idea poorly executed (because I simply ran out of time to properly fair them) to cover the glass tapes that joined the stanchions to the hull sides on the outside (inside is glassed too). I wasnt confident I could hand shape the coving around the bases because the shape of the hull curve changes along the various points along the hull sides.
My solution was to cut the tops off soda water bottles (they had to be from brands that did not have anything molded into the stem of the bottle) then cut the sides of the bottle to the shape of the hull. Once I had the shape right I smeared a mix of microfibres and microspheres (cabosil and qcels), enough to fill the bottle top mold and let it set. Once set, cut the bottle away leaving a nicely shaped cove around each base. In theory. In practice they needed a little cleaning up, which I mostly did, but I had no highbuild left and no time to apply and sand it had I had any. So once the gloss hit them they roughed up a little. The idea was also sound because by cutting the top off each bottle at the screw top the hole was exactly the diameter of the stanchion and the hole was always square to the stanchion so once shaped at the base the mold always made the correctly angled base. But poor appearance aside they will do a great job keeping fender ropes off the hull side and stiffening up the stanchion hull bond.

The glue lump on the next image is on the plastic mold.

The base with the plastic bottle cut away. Quite neat.

The bow seats have a full size stanchion as one corner, a slightly over length leg on the forward point and the lifelines will end on that leg so both these have holes all the way through the seat base and slid down to the correct height and the other 2 legs will sit in holes drilled into the base of the seat (20mm ply) to 10mm deep and glued down. The full height stanchion has a hollow centre to just under the seat height so that a power wire can protrude under the seat from inside the stanchion to power the port and starboard nav lights that will be on plates under the seat and against the stanchion (the string taped to the stanchion is to pull the wiring down through the stanchion to inside the forward well and into the boat).

I will use my usual method to make the seats to exactly fit the now fixed leg position. A stencil.


A couple of weeks ago I received advice that I was crazy if I didnt guide coat the final sand down of the highbuild I sprayed on. Even though I explained my rationale (have stopped fairing now and am only key sanding) the adviser insisted that the guide coat would help by showing me when to stop sanding the orange peel out of the finish by leaving black peel until the surface was proper smooth and all one color, hopefully still white meaning I had not sanded through to bog again, defeating the purpose of this final final coat of highbuild. And he was right (Thanks Craig). Against my gut feeling not to, we sprayed a guide coat on the port hull (the starboard hull was already sanded) and next day I started sanding and the guide coat did help me better guage where to stop sanding. The only problem was I knew the surface was not completely fair and in places, in order to get the guide coat off again I would sand through. This worried me because I did not want to leave any on in case it showed through the paint (I neednt have worried but didnt know at the time) and couldnt allow myself to sand through. It all worked out in the end and did save me some time. It didnt get me any fairer because I wasnt blocking the sanding I was using the whizzer but it did mean I spent less time blowing down and checking.


After sanding down the entire boat for the final time I went around trying to fix as many of the visible problems I could find with car bog. It sets in 20 minutes to sanding hard and is mostly for filling pin holes and some cove shapes that didnt look great. I did not have time to re-cove with qcel nor did I have time to fix everything I found (and quite a few I didnt find until the gloss hit them!) and in fact I even missed sanding some of the car bog back down even though they were bright red on a white background. That’s what trying to cram 3 weeks work into 3 days does to you.
In the end I got done as much as I possibly could in the time and budget I had left and my brother arrived and we prepped and painted the surfaces I had.
Without too much more to say I will let the pics do the talking. The prep work prior to painting took longer than the painting did. It consisted of an initial blow down then wash down (with metholated spirits) before initial prepsol to aid the masking tape to stick then masking up and final prepsol rub down. We did it in stages. The sides in grey went on first so we masked up covering the rest of the boat not getting grey with plastic.
Then a near fatal error by the apprentice paint mixer. Me. Terry came to help and he and my brother masked up. I rubbed the boat down with prepsol (wax and grease remover) to ensure the paint stuck to the boat. Then they suggested I start mixing. I stirred the paint. Measured out then added the hardener and filled a gun. Colin sprayed a small area and no color. He said this paint is no good, we better go buy some more. We went off to get some from the nearest auto paint supplier. The paint cost $730. I have $230 in the bank. Jo was in transit so we waited for her to arrive with her credit card. In the meantime Colin suggest we also check the white paint as that was probably off too. It stirred up with plenty of pigment. No problem. He decided to double check the can I stirred and I hadnt even scratched the pigment settled into the bottom of the can. After properly stirring the paint and remixing we were good to go. Crisis averted.


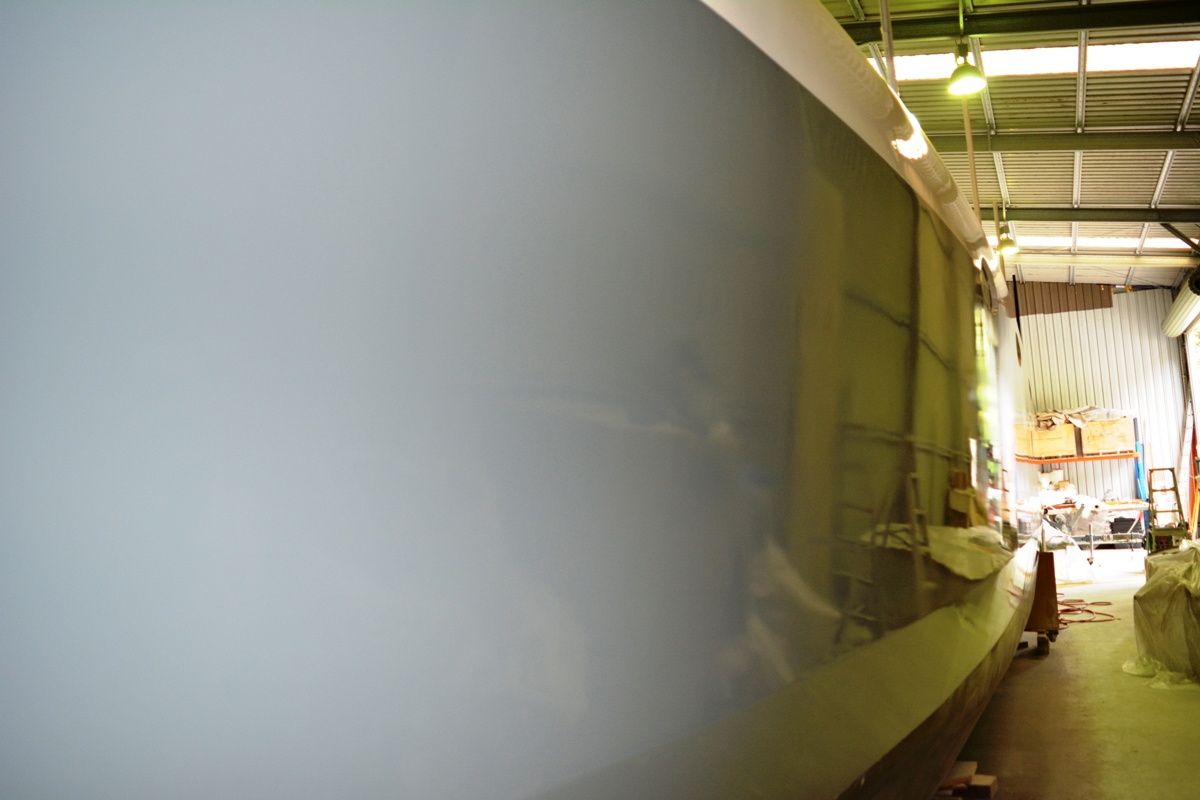
Next day we covered the grey so as not to get white on it and masked up for white. Prepsol wipe down, mix paint and spray it on. With the grey we finished both sides in about 2 hours so had to wait 2 hours for the first coat to tack off enough to paint the second coat. The white took so much longer that by the time we had got from start to finish enough time had elapsed that we could start back at the start and keep spraying. All up we sprayed white for 5 hours before starting on the second coat. Fortunately that only took 2 more hours. (Some areas, for example the cabin roof, only got one thick coat because nearly its entire surface is under the solar panels or non-slip paint). High wear areas such as hull sides that will get rope rub, got 2 thick coats, as heavy as he dared without getting runs. We only got 1 run on the entire boat, in the grey on the inside starboard bow under the trampoline.
Next day with both colors sprayed we removed all of the masking and plastic sheeting to reveal Yikes new appearance.
We painted every surface except under the bridgedeck and under the cabin roof. We had to because we ran out of white and knew after the first coat that we wouldnt have enough to do them. I will roller that on later. We also did not spray areas that will be non slipped. That too will be rollered on later. Ironically we ran what turned out to be a beautiful hand layed curve of the grey on the inside of the bows. We could have run deeper under the hulls with grey as we had 2 litres left of grey, that would have saved some of the white to put on the cockpit roof. No biggie, I had decided I didnt want gloss on the cockpit roof anyway and I really dont care what the bridgedeck looks like. All up we used 12 litres of white and 6 litres of grey (2 left over) and will need about 4 more litres of white to finish the bridgedeck underside and cockpit roof and I will need 12 litres of the non slip I have settled on. Kiwigrip. More on that when I get around to doing that.
For now check this out.


So here we are. I will take a few days off. Then start a big inside the boat clean up. Then start fitting things onto the boat such as port lights, hatches, winches etc. Steering needs final fit, then motors and wiring. Mask up for non slip then roller it on. Paint the rest of the unpainted bits. Its a long list. But the end is getting closer.
I have a deadline but dare not mention it. You know why!
Thanks so much for reading. I am sure many of you are exhausted as I am. The next few posts should be fun. Hang in with me. Cheers.


Greg Smith
Bloody hell Paul.
That looks fantastic!
Congratulations.
Best wishes,
Greg and Kerry (Adelaide)
tom siemerink
Hi,
I’ve been mmonitoring your site for years and I must say, Good Job !!
What a beautyful boat you built!
I am looking forward to see her in the water.
Keep it up, you are so very near now.
With regards,
Tom..
webmaster
Thanks guys. I have a warts and all policy here so perhaps I should take some pics of the not so flattering bits. I have plans on how to repair the worst of them so perhaps the next post might be a how to fix blemishes post. They are very superficial and not so obvious if not looking for them. So all in all I am pretty relaxed about it now. Cheers Paul.
Mike
Paul, Progress. Substantial, Visible, Visceral, Satisfying Progress. Congrats and Kudos for your perseverance!
webmaster
Hi Mike, thanks mate. How is the cruising life treating you?
Gerald
Hey Paul
I had a feeling you would be making the big reveal soon so I’ve been checking in on the site every day for the last 2 weeks.
She is beautiful, congrats for sticking with the project. I’m loving the color scheme.
Regards
Gerald (South Africa)
webmaster
Thanks Gerald. The colours are great. Funny thing, I was told that the darker the colour the more it will highlight any poor fairing, and all of my issues are with areas of white, the grey is fantastic if I do say so myself. I did put a little extra effort into the sides and ran out of patience with the white but believe me the white shows them all, its just that you can’t see them from anything more than a few feet.
Matt
That is a big achievement!
Congratulations to you and all the people that helped along your way.
I like the 2 tone job. Looks sharp.
selvin
WOW. I HAVE BEEN FOLLOWING THIS BUILD SINCE YOU FIRST BEGAN AND I AM AWARE OF SOME OF THE CHALLENGES YOU’VE ENCOUNTERED ALONG THE WAY, BUT YOUR PERSISTENCY HAVE BEEN AN INSPIRATION TO ME, THANK YOU
webmaster
Thanks so much for your comment Selvin and to all the others that have sent congratulations, the encouragement has meant so much over the years. I also wanted to show that regardless of your position in life, we here in the West are so lucky that even the lesser paid of us still can dream big. I have had high paying jobs and for the last 5 years low paying jobs, and I wont pretend it wasn’t harder as a lower paid person, but I have shown (and I am just an ordinary fellow with a wonderful and supportive wife) that with just a little grit and determination and with the love and support of those dear to you anyone can do what I have done and more. Go for it dreamers, Cheers, Paul
Rick
Congrats.
Having lived aboard a flag blue hull for 15 years I can assure you that if the surface looks pretty good on the hard (yours looks awesome btw) that it will look WAY better in the water. Don’t sweat small stuff that (only) you see now. You won’t notice it when it’s floating. I’m sure you’ve been told that already and it’s absolutely true.
I’ve been following this build from the beginning (when we were both younger men) and I assure you that you and your wife (you know she out-ranks you, right?) that you have every right to be extremely proud.
I’m eagerly looking forward to your future posts.
Keep the faith.
webmaster
Thanks Rick. Yep aware of the rank on board. If you ask Jo she paid for the boat, I merely built it, so yes, she outranks me as owner! And your points about perspective regarding small cosmetic flaws, again, the owner has been telling me that for some time now. So yeah we are pretty proud of ourselves. Cheers
selvin
thank you my friend i am extending an invitation to you and your wife to visit Jamaica when your finish building. really friend you deserve all the props, because of what you’ve done i am setting my focus of building one for my retirement, hope to keep in touch with you.
Jim Long
Paul,
Beautiful color, smooth finish, starting to see light now at the end of a very long tunnel, Congratulations man!
Best, Jim